Thursday, December 29, 2011

New Year and a time to Reorganize

Recently folks on the ArtDigest list have been talking about reorganizing their workspace. It has inspired me to do the same. My husband built a really wonderful table/storage for me during the Summer. It is exactly what I wanted but takes up a lot of space in my 12 x 16 room.

originally I had the table pushed up against the black design wall. While the table is on rollers it is still pretty hard to move around and I found that I wasn't using the design wall very much.

Someone on the Digest suggested that the table be put in the middle of the room. I tried this and it works quite well. When the sewing table leaf is down there is lots of room to move and when it is extended to quilt I can still get around the table.

This view shows one of my design walls.


This peg board holds lots of my tools in order and the shelves below organizes my books, and other goodies for my work.

One of the things I did was get rid of patterns that I have made and used for all my quilts. I decided they were just taking up much needed space so out they go.
Does this look like fifteen years of work?

With a cleaned and organized studio I have no excuse not to get to work. Hope to have something new to post soon.

Saturday, December 17, 2011

Finally, Some Time to Post

Sanctuary II

It's been almost a month since I've had time to post on my blog. I've been busy teaching, and getting my studio back together. Life has also gotten in the way. Good things but not leaving me time to do my art work.

I've missed working more than I can say and I'm really looking forward to the New Year and having more time.

The Arts Guild of Clemson, SC is having their first members show in January and I have decided to enter two pieces. Sanctuary II is two photo I manipulated in Photo Shop Elements. It is printed on cotton sateen and matted and framed.


This is a silhouette of a bird taken in a sanctuary on Harbor Island, SC. I did a little color enhancing to make the background a little more pink. I then decided to add the following photo.


The color was removed from this photo and I added a pinkish color. I then blended the two photos to achieve the following photo. I also flipped the photo so that the birds would look better together.

When I framed the piece I felt that a little needed to cropped off to make the design more interesting.


Spirit of the Kiva II

This piece was treated similarly to the one above. I began with the photo below taken when my husband I were visiting NM.

This is the interior of an American Indian Kiva or Holy Place. I felt so blessed to be in this space. The lighting was wonderful, I was in there by myself and fortune smiled upon me.


This beautiful child's portrait was taken in Copper Canyon, Mexico while my husband and I were on an Elderhostel trip several years ago. I then constructed the following portrait.


After I photographed the portrait of my little Mexican beauty I blended that photo with the photo of the Kiva to achieve this final design.


I quilted this piece before I matted and framed the finished piece. I chose to quilt the lines of the Kiva leaving the girl to appear as a presence.

I will be off line until after the holidays but I wish you all the best of the Season.

Sunday, November 20, 2011

More Folk School park two


This is a group shot of the amazing students I taught at J C Campbell the week of Nov. 6. How is it that I luck into having such wonderful people as my students. Maybe the atmosphere at JCC has something to do with it.

As promised I am going to post the remainder of my photos tonight. This is Tone C. with her beautiful daughter, beautifully rendered by her Mother. Tone is also an instructor at JCC. I'm always a little intimidated when I have a teacher in my class. However, Tone put me at ease and let me believe I was really teaching her something.

A close-up of the finished top. Tone is also is a felt maker. She used her own felt for her daughter's hat. She also free-motion thread painted some of the flowers in the background. Beautiful job Tone.

Mary was another student who really didn't need my help in making the portrait of her daughter and son-in-law. Mary is a doll maker and a wonderful one at that. She came to the class with a vision of how she wanted this done. I think her vision was right on. Another beautiful job.

Susan C. is doing a wonderful job on this piece. The portrait is of her good friend, Ellen. Ellen taught Susan how to quilt.

Susan was having a problem with the fabrics for the portrait. I have to assume responsibility for that as I guided her in this direction. I recently received a note from her and I think she has this worked out in her mind now.

Susan had perhaps the hardest landscape to make and she got a lot done considering we only worked two days on the landscape. Another job well done.


Susan M. is Susan C's sister-in-law they decided to take this class together. I got the feeling from Susan that this class was way out of her box. I believe she told me that she had never done anything like this before. I really would rather have someone who doesn't have a preconceived idea of what they need to do. Susan was very open to suggestions and really listened to my instructions.

Her portraits did not have as much information (pixel wise) as do most of the others. This made the pattern a little harder to read. I was so proud of what Susan did in this class. I can't wait to see it finished.

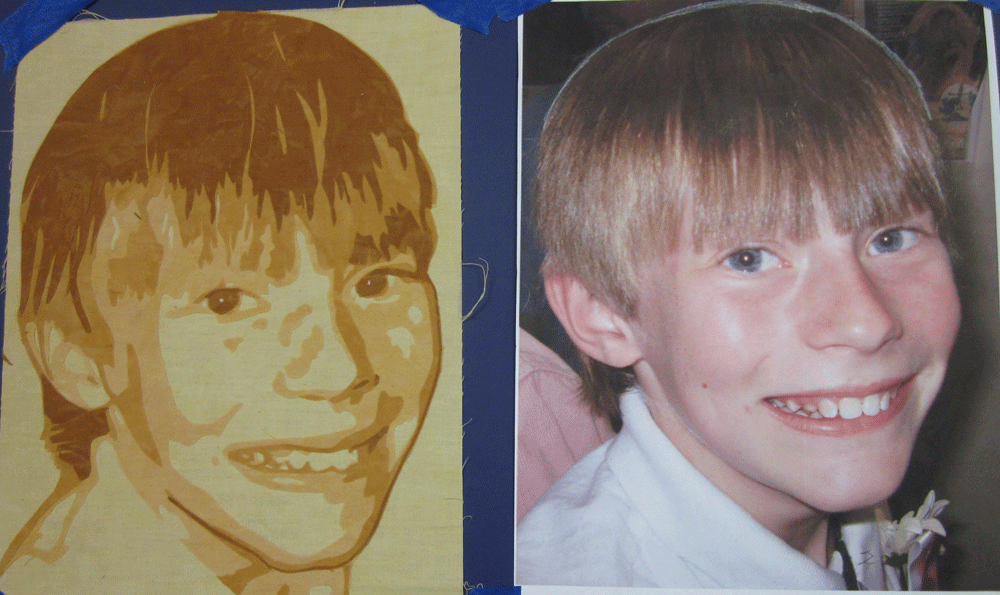
This is Beverly K's grandson. Beverly is one of those people who is her own worst critic. (She admitted this to me) She did such a wonderful job on this piece, but it was not without inflicting self wounds. I'm stretching this a little to make a point. I really want my students to enjoy what they are doing. I also want them to work to their best ability but love of creating should overtake perfection.

Now that I'm off my soap box, Beverly was unhappy with the dark fabric around the outside of the face. I agree that the transition was to stark. After Beverly returned home she changed that piece.

This is the redone face. Great job.

How do I do this every time. I missed getting a photo Donna D's granddaughter. If you read the previous post Donna created the landscape of the lake. Her granddaughter's photo was another hard one to work with. Her face was in shadow and we had to guess at some things. However, it was really turning out to be a very good portrait. Sorry Donna.

Jane O. did a great job on her granddaughter. She has a very complicated portrait to work on as there are three people in the photo. Jane sent me the photo and I just fell in love with these three faces.


I usually recommend that my student start with one portrait but when you think about it that's what they are doing. They just finish the other two at home. Jane did a super job on this and I can't wait to see the finished piece.

This is Mary M. with Stephanie and Grace. Mary is a real animal lover. These animals are lucky to have her in their lives. Mary wasn't real happy with her fabrics for the dogs. She was thinking about changing them later. I thought that they worked quite well. The fabrics were heavy, textured fabrics. I see those as working well for animals.

We all decided that Mary's leaves worked really well for this piece. They lend a feeling of folk art to the piece.

What can I say now. I have made eight new friends in the quilt world. I hope that I inspired in them the desire to continue creating. I know that they always inspire me.

Saturday, November 19, 2011

More Folk School


I'm going to finish blogging about the landscapes that were part of this class last week. Beverly K. wanted to portray her grandson at the lake where he likes to fish. She brought a piece of batik fabric where colors blended into each other and represented the water quite well. After adding a little paint to get yellow in the right areas she had the perfect piece.

Since we only had two days to actually work on the landscape Beverly was not able to get the leaves of the tree finished. She was throwing around several ideas one being snippets. There are several ways this could be done.

What she has on the background now is leaves that she fussy cut out of printed fabric. I demonstrated a technique I use where you cut out small pieces of fabric and place them between tulle and Solvy. You then thread paint over the surface and connect them by threads.


Mary K, sent me a photograph of her daughter's wedding. They were married in a field in Ohio that was lovely. However, Mary wanted to present them in a landscape with Stone Henge in the background. Stone Henge represented the careers of both bright and groom.

I knew before Mary came that she had a vision for this piece. I love to see students do their own "thing". I only guided a bit so I can't take much credit on Mary's piece.

Mary is also a doll maker. If you look up in the right hand corner you will see a stick doll that she made out of a piece of broken tree limb and fabric.


Mary M. is a lover of animals. She rescues both wild and domestic animals. She is certified to take wild animal babies into her home and nurse them back to health. She is also the owner of five dogs.

It was natural then that Mary chose two of her dogs to portray in her piece. Mary's family has owned a piece of property on a lake for a long time. She chose that location for her landscape.

Tone C. worked on the largest of the landscapes made last week. Don't know how but I failed to get a photo of just her landscape. During the time we emailed before class I got the feeling that Tone would be open to an abstract piece. I emailed her about the possibility of an abstract and she was eager to proceed in that direction.

I'm going to leave her photo for the post when I talk about the portraits. More later

Wednesday, November 16, 2011

J. C. Campbell Class

It seems I've been burning the candle at both ends recently. Out of the last 24 days I've spend eight of those days at home. The at-homes days were scatter here and there. I've enjoyed teaching and my trip to Houston but am now paying for the stress with a sinus infections. Don't get me wrong I would do it all again I'm just feeling a little sorry for myself right now. (besides it's rainy and I always feel better on sunny days.)
This beautiful red oak tree decorates the parking log at the Fiber Studio on the Campus of J. C. Campbell Folk School. I have never been to Campbell when I wasn't inspired by its beauty.

The title of my class last week was "Personal Places: Portraits in the Landscape". This class combine two classes into one. A landscape class and a portrait class. Both are quite an undertaking for a week class but the two together makes for a very intense class. This group came through with flying colors. I'm going to break this post down into two or three sections. Today I'm going to post about the landscape sections.

I like to start this class with the landscape for several reasons. It is a simpler class than the portrait one and it also gives me a chance to see how each students works with fiber and how she/he sees fabric. It also provides a canvas for the portrait.


Susan C. chose a photo of her friend Ellen to create in fabric. Ellen's home is in a word "homey". She has wonderful antique pottery and furniture. She does a lot of quilting so Susan wanted to portray her doing just that.

Because I exchanged many emails with Susan before the class I knew that she had experience with landscapes. I asked her if she would like to begin her piece at home by working on the quilt in the photo. She did just that and gave herself a little hands-up on the project. Her quilt will show up later in photos to follow.


This piece is being worked on by Donna D. Donna wanted to make a portrait of her granddaughter. The setting is a lake that means a lot to their family. Donna seemed to start off a little slow and then I turned around and looked back and she had the whole forest finished.


Jane O. sent me a photo with three of her grandchildren included. I usually discourage more than one portrait in a beginning class but as long as the student realizes that they won't be able to get more than one made I don't object. Besides, I loved this photo and wanted to see Jane work on it.

The beach means a lot to Jane's family. The kids were sitting on steps that went down to the beach. The steps were out of focus and would have made a really interesting abstract background. However, Jane wanted to have the experience of making a landscape so we chose a scene from the beach. Jane will thread paint sea oats on the sand dune.

I've gotten too wordy and will post more later.

Saturday, November 5, 2011

Off to J. C. Campbell Folk School


View from the porch at the Keith House.

My cars packed and I'm ready to roll. Off tomorrow for a week at J. C. Campbell Folk School. Looking forward to meeting new students and spending a week at a wonderful place. Keep a look-out for more.

Friday, November 4, 2011

A Trip to Houston and IQA


This photo was taken from my seat in about the third row for the awards presentation on Tuesday evening. My plane was late arriving and I had to wait on my shuttle. I got to my hotel at 5:00 and the awards ceremony started at 6:00. I had time to shower get dressed and get another shuttle to Brown Convention Center.

I arrive about two minutes before the presentations started. I was still getting my breath when they announced that Digital Imagery would be the first category. They announced the third place winner and it wasn't me. I took a deep breath and then they announced that "Ohm" by Marilyn Wall had won second. They flashed a picture of it on the screen and I went up to accept the ribbon.


Afterward I was kind of in daze and don't even remember the next few awards. After all these years to have my work recognized at this level is truly rewarding.

Hope I will have time to post more later. I leave Sunday to teach for a week at JC Campbell so I'm busy, busy, busy.

Sunday, October 30, 2011

Fast Friday Fabric Challenge: Oct.

This month's FFFC is to create a Notan.

Notan is a Japanese concept that utilizes black and white to demonstrate the contrast of positive and negative space. Often done as pen-and-ink drawings, Notan can easily be adapted to fabric with stunning results. This technique can help us evaluate our own skills with balancing the positive/negative space in our quilts


I have always enjoyed working with positive and negative space. Often when I am looking at designs I see the negative space first. Won't ever forget when the first Batman logo came out. I couldn't see the bat and wondered what the logo had to do with Batman. I still have to look at it and concentrate on the image before I can see the bat.

I'm not sure what that has to do with any thing except that I think I must see negative space first. That said I loved this challenge. Unfortunately my time won't allow me to do an actual piece but I will get back to it ASAP.

This project is one that you can work on any where. All you need is a piece of paper and scissors. I did this design sitting on my sofa watching the World Series.

Since the Palmetto tree and crescent moon are SC logos, I decided that I would work with those images. It took a while to realize that I had to make the moons one at a time. I was able to cut the tree out of folded paper by cutting out one tree.

This is pretty easily done with free form cutting.

Tuesday, October 25, 2011

Fabricating Faces at QSC Retreat

Amanda B.

This past weekend I taught a class at the South Carolina Quilt Guild's Fall Retreat. I had twelve students in the class all of whom caught on to the technique right away. Being able to teach this class in a weekend instead of a one day class was so nice. I was able to cover more of Photo Shop Elements than I can do in a 6-hr class.

Ann S.

I had a set of sisters as well as a Mother/Daughter in the class. This was a great way to visit and yet learn and have fun.


Jeanne P. did this portrait taken by a friend who visited Africa. Ann and Jeanne were the sisters in my class. Jeanne is going to use this in a larger wall hanging. She is going to bead the earrings and the neck piece. Can't wait to see this finished.

Carol A.

Is he not a cutie? When Carol sent this photo I fell in love. She did a really good job. Carol was one of the two computer geeks who were invaluable in my class and I thank her again for her help.


Darlene

This is the portrait I posted last night when I blogged about lips and eyes. Darlene also did a great job. She was my second computer helper and really owe them a lot.


Haley K.
Haley is a member of our local guild and it was really nice getting to know her better. She did a portrait of her son when he was a few years younger and one of her first grandchild. Both beautiful.


Nancy
This cutie is actually a baby photo of Amanda who's portrait leads this post. Nancy and Amanda are Mother/Daughter. When Nancy was almost done with her portrait I walked by and asked her if she would mind cutting the last layer over again and changing the fabric to a lighter value. She agreed and I think she was very happy that she took the time to change to a lighter fabric. You have to enlarge this photo. and look at the drop of slobber on her bottom lip.

Four of my student left before I could get a photo of their finished portrait. I hope they will send me a photo so that I can post them as well. Hopefully more later.

Monday, October 24, 2011

Fabricating Faces


I commented on my last post that often students want a defined mouth and eyes in their portrait. Sandi made a comment asking if I would post a comparison to the example I showed of my Dad. In my class this weekend Darlene's granddaughter's mouth was a perfect opposite of my Dad's.

My Dad's lips are just shapes of dark and light where Darlene's granddaughter's is what we think of as shaped lips.


The same goes for the eyes. My Dad's eyes here are shapes of black not round as we think of the iris as being round and some people have a problem with just adding shapes as I did in my Dad's portrait. Again this is Darlene's granddaughter and her eyes look "normal" to us.


What I want students to understand that Darlene's photo was perfectly lit. Her granddaughter's eyes do not disappear when she smiles as many of ours do. Therefore the photo made a great pattern with witch to work.

My Dad's portrait was made many years ago and I had to scan it into my computer. So a pattern from which to work was not as clear, and like me, his eyes tend to disappear when he smiles.

However, both photos made a pattern translated into a likeness.

Check in again soon, I'm going to post on the great class I had at QSC this past weekend. Didn't Darlene do a great job?

Wednesday, October 19, 2011

Off to QSC Retreat


I'm off this week-end to teach at Quilter's of SC Fall Retreat. I'm going to be teaching Fabricating Faces and as always I like to make a new portrait just to refresh my memory of how the steps go.


I was going through some family photos recently and found this photo of my Dad. I scanned it and downloaded it to my computer to do the work in Photo Shop to get a good posterization.

Often my students will want to have a defined mouth, nose and eyes and that does make sense. Those are features that define us. However, I have made several portraits where all those features aren't defined and they turned out looking just like the person I was portraying. I wanted to make another one so that I could point that out to my students.

What do you think?